
Here are the instructions for configuring ROON version 1.3 or later to work with Out Of Your Head.
Also ROON 1.3 or later supports multichannel audio files and works great with Out Of Your Head for 5.1 or 7.1 audio files.
NOTE: These instructions are for Windows. But similar settings should work for MacOS also. In MacOS, the names of the devices will be different. The Out Of Your Head Virtual Audio Device is called “OOYH(16CH)”.
First, make sure you have downloaded and installed the latest version of Out Of Your Head.
Then, launch Out Of Your Head.
Then you can launch Roon.
In Roon, you must enable the “Out Of Your Head Virtual Audio Device“.
To do that, in Roon, click on the menu icon in the upper left corner of the Roon interface.
In that menu, select “Settings”.
Then in the Settings window, select “Audio”.
In the list of devices, you will see an audio device called, “Out Of Your Head Virtual Audio Device“.
Click the “Enable” button to the right of the “Out Of Your Head Virtual Audio Device“.
You can give that device a name like, “OOYH”.
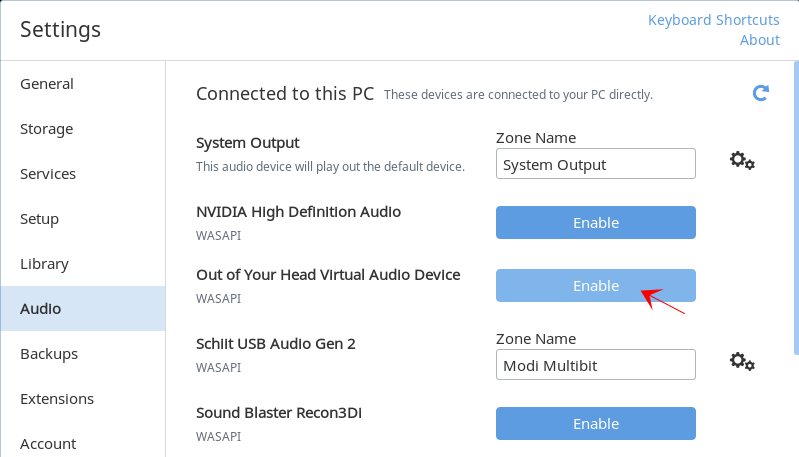
Once you click on Enable, the “Device Setup” window will open automatically.
In the settings screen, set the “Volume Control Mode” to “DSP Volume”. (This way the volume control in Roon will control the input volume of Out Of Your Head.)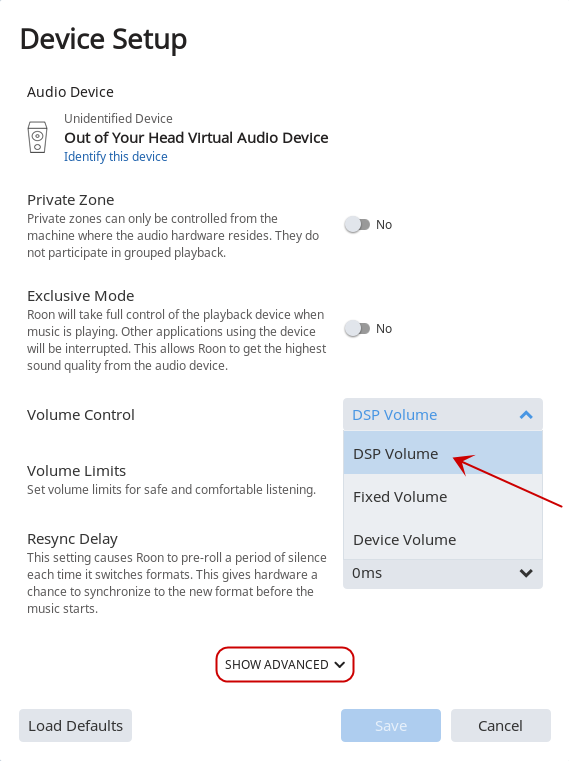
Then click on the “SHOW ADVANCED” button to show the “Advanced Settings”.
Scroll down to show the Advanced Settings.
Make sure “Use Exclusive Mode” is NOT enabled.
Set the “Max Bits Per Sample (PCM)” to “32-bit”.
Set “Channel Layout” to “7.1” (Set it this way regardless of the number of channels of your source material.)
Set “Send stereo/mono content as 7.1” to “Yes” (Again always leave it this way regardless of the number of channels in your source material.)
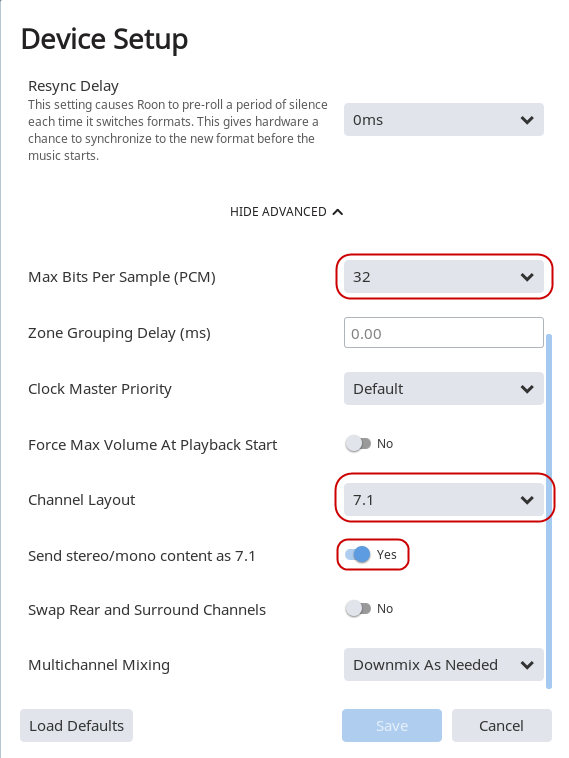
Then click “Save”.
Keep clicking off the windows until the Settings window is closed.
Then, we must select the Out Of Your Head device as the output device in Roon.
In the bottom of the Roon interface, click on the “speaker box” icon to bring up the “Zones” window.
In the Zones window, check the box next to the Out Of Your Head device.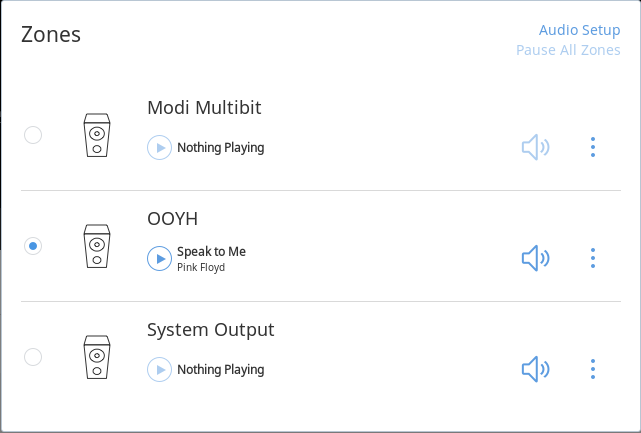
Then click off the Zones window to close it.
Now we are finally ready to play some music!
When you start music playing in Roon, you should see audio level meters going in the Out Of Your Head Control Panel and hear audio on the selected output device in the Out Of Your Head Control Panel.
OK, hopefully it’s working.
NOTE: On some systems, depending on how you have your devices setup in ROON, if you see the audio level meters moving in the Out Of Your Head Control Panel, but don’t hear any audio in your headphones, then most likely both ROON and Out Of Your Head is trying to control or output audio to your DAC at the same time. This will not work.
The best way to test this is to “Disable” your DAC device in ROON.
To do this, open the ROON Settings/Audio to see your audio devices.
Then click on the little “gears” icon next to your DAC and select “Disable”
If you have more than one enabled device for your DAC, disable all of them. (You can re-enable them when Out Of Your Head is not running.)
Once they are all disabled, exit Out Of Your Head and relaunch Out Of Your Head.
Try playing audio in ROON again.
When Out Of Your Head is working, you should see some small numbers in the bottom left of the Out Of Your Head Control Panel that “hover” around a value. If the numbers are counting up higher and higher, then ROON is still trying to control the DAC and Out Of Your Head cannot send audio to it.
Please contact us if you have any trouble getting ROON to work.
